There has been significant growth in the number of people buying houseplants for their homes. Ever since the pandemic, many people have started investing in plants to add more natural accents to their homes. The most common plants people use to decorate their homes are cactus plants and pothos plants.
After cactus plants, many have found that pothos plants are also straightforward to take care of. Pothos plants have a lot of variety which makes these plants stand out and thus causes many to find new and creative ways to house them in their homes. Many exciting features about Pothos plants make them a favorite with plant moms. The fact that these plants don’t require much attention is one of the primary reasons they thrive in all environments.
In the article below, we’ll discuss some ways to make and keep a DIY Pothos moss pole so that you find it easier to present your pothos plants.
What’s a Moss Pole?
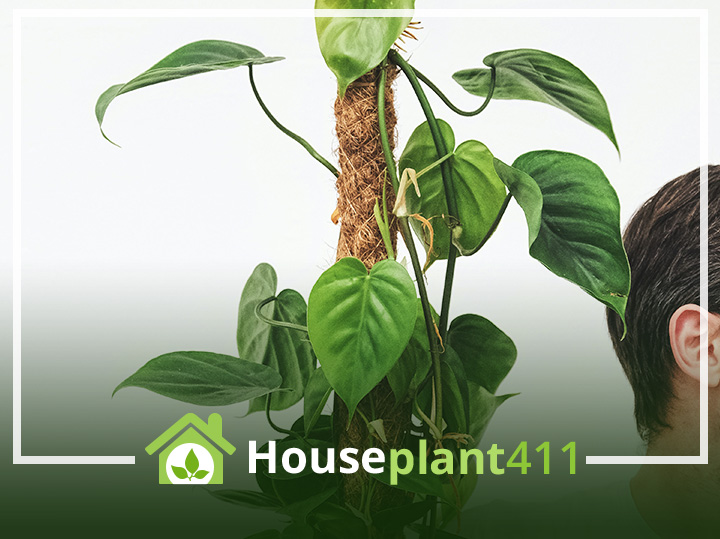
A moss pole is exactly what it sounds like, meaning it’s a pole that moss or any plant can grow on. A moss pole is the newest trend in the plant market, and many will emulate this moss pole in their home. The reason behind the moss pole trend with Pothos plants is that this plant is an epiphyte that requires other plants to climb on to as it grows.
To define moss poles, you must envision poles with moss all around them. The moss or foliage allows pothos plants to climb on and grow around these plants. Moss poles are an artificial interpretation of a canopy of plants that plants would otherwise find in the wild.
Why Make a DIY Pothos Moss Pole?
There’s demand for moss poles in the market. However, if you try to find one in the open market, you will see that they cost an excessive amount of money, and most of the time, you need to figure out how good the quality of the moss on the pole is. It’s easy to DIY your pothos moss pole, as so many people have tried and excelled at it.
It’s a project that allows you to have many more pothos plants and creates a neatness to their presence in your home. DIYing a pothos moss pole also means saving yourself a lot of money and using the same money to add more plants to your surroundings. Furthermore, it’s a skill you can add to your repertoire, as moss poles are here to stay for a bit.
Moss poles are also exceptionally useful if you have an apartment with limited space. Since moss poles are vertical, they don’t take up a lot of space which adds to the number of plants you can have in your home.
How to Make a DIY Pothos Moss Pole?
Once you’ve decided to make a DIY Pothos moss pole, things will start to simplify. You can then take the proper steps to DIY your moss pole. The steps are simple:
Step 1: Gather the Materials
You can only DIY a moss pole with the right equipment. You’ll need the following:
- A stake or pole made from a material of your own choice. Make sure that the width and height can sit comfortably in your home. You’ll have trouble replacing the central pole over and over again, so this is one thing that you must feel at ease with.
- A large pot that’s greater than 24” in diameter. The pole will have to sit in a pot covered with soil, and you want something that can handle its weight without toppling over.
- Moss. The moss can be of any kind.
- Markers, sharpies, scissors, a hot glue gun, and a staple gun. The stationary is necessary for helping you plan and mark different cuttings. You would also need to stick the moss in place, which is why the hot glue gun and staple gun are necessary.
- String or twine to attach the moss pole.
- Potting soil and small pebbles to keep the moss pole in place.
- Pothos plants
Step 2: Markings on the Pole
Firstly, you must decide where you’ll be keeping your pot. You want to set it out in a place that gets indirect light as pothos plants act the best here. You will then place the stick into the pot and mark using a sharpie where you want the moss to come to. A good measurement would be an inch lower than the rim of the soil. You can cover anything above the line in moss instead.
Step 3: Measure Out the Moss or the Coco Liner
Choose between your moss and the coco liner covering your PVC pipe. Many people use a combination for the most excellent coverage. Measure your coco liner by placing the pipe on it and measuring the amount of liner it takes to wrap the pole at least once. You can then use the scissors to cut out the necessary measurements.
Step 4: Attach the Liner
The liner then needs to stick to the pole to provide a base. You can grab a staple gun instead of the hot glue gun, as the hot glue gun can harm the coco liner. If there are any significant gaps in the liner, you can fill them with glue. It takes a fair amount of effort to staple the liner into the pipe, but once it’s done, it may be easier for you to make the moss pole. Most people suggest that you do two layers of lining.
Step 5: Soak the Moss
Depending on the moss you have opted for, you will want to soak it so that it’s easier to attach to your pole. Many people skip this step as just having a liner is enough. However, adding the moss gives your moss pole more space and dimension so the plants can grow on the pole with ease.
You want to have damp moss but need one that’s soaking enough to wear down your pole.
Step 6: Attach the Moss to the Pole
Once you have soaked your moss for a good 15 minutes, you can place it on your moss pole. The first thing that you must do is attach a long piece of string or twine to your pole. Start at the top and then start placing the moss on your pole while using the rope to hold the moss tightly in place. You want to opt for a diagonal direction so that the moss can be easily kept in place by the string. You want to keep attaching the moss until both ends have enough coverage.
You want to have ample coverage with the moss all around the pole. The part that will sink into the pots needn’t have moss as it’s simply not required. Once you feel that the moss has set into place, you can tie the end of the string into a not around the pole so that the moss stays in place.
Step 7: Place the Pole in the Pot
You need to place the pole in the plant to see how much of it you need to cover with soil. Cover the pot in the soil so the pole can easily ground into it. We suggest you place the soil into the pot before you dig the pot in. You can then use the pebbles and extra draining soil in your pot to create more of a moss pole look. This is when you want to pack in the soil so you can hold it up.
Step 8: Add the Pothos Plant
You can then add the pothos plant to the soil. You also want to see that you’re not trying to force the plants into growing a certain way; instead, you’re working on preparing the plants for easy growth onto the pothos plant. Most pothos plants have a flexible stem that can easily coil around the moss pole. However, you can help the plants by taking some long coils and gently coiling them around the moss pole.
Many people think now’s the time to add support ties, but that’s only partially necessary. You may do so for a bit in the beginning, and then when you feel that the pothos has taken a liking to the moss pole, you can cut the support ties. Make sure that the support ties are strong enough. It would be best if you allowed them space and ease. You also want to continuously keep taking care of the moss plant.
Voila, you have a DIY pothos moss pole which should not cost you more than 50$. This is time-consuming, so you may not be up for doing it at all. You can thus purchase a moss pole instead, but this can cost you anywhere above the $200 mark, so make sure you make a wise choice.

Benefits of a Pothos Plant
Propagation is Easy
Compared to other indoor plants, pothos propagation is one of the simplest tasks. Take a cutting, and then remove the lowest leaves. Give the water a weekly change and submerge it in clean water. After spending some time in the water, you can quickly shift the plant into a soil pot.
Doesn’t Need Sunlight to Grow
Without direct sunshine, pothos can still grow. It’s a tolerant houseplant that grows well in cool temperatures and drought-like conditions with low lighting. Although they grow slowly and exhibit less variation, these plants won’t perish. If you live in an area where sunlight doesn’t prevail, a pothos plant will work just as well.
It is Easy to Maintain
Pothos is widely available all over, and planting it is also not difficult. It is extremely reasonably priced if you get it directly from a nursery. You can take a cutting from a friend’s vine and propagate it in your house because it is also incredibly simple to grow from cuttings.
The low-maintenance houseplant pothos thrives in various environments, including sun and shade, damp and dry soil, and unsatisfactory substrate. However, please place it in a bright, indirect area of light and water it only when the soil seems dry to the touch. Low-lighting situations will prevent them from becoming less varied.
Ensures Greater Humidity indoors
Because viruses can’t spread quickly in moist air, humidity can protect you from the common cold and influenza. It also keeps your skin moisturized. On the other hand, dry air intensifies airborne contaminants, dust, and allergy reactions. Humid air has many benefits; thus, adding a pothos plant to your home can help increase the benefits you reap.
With these plants in your home, you may no longer need humidifiers in the winter.
They are Extremely Decorative
These plants look very pretty and can be catered to make your home feel cozier and more natural. You may coax a trailing plant such as pothos to grow on practically anything. This houseplant has the unique ability to be either a trailing or climbing houseplant, depending on your preferences. Additionally, unlike other houseplants, it doesn’t lose its luster in the absence of sunlight.
Ensures that the Air Remains Oxygenated
The pothos plant is a plant that is good at purifying the air indoors. Pothos is particularly effective at removing pollutants and VOCs from the air. According to NASA research on clean air, the facility removes airborne contaminants such as benzene, carbon monoxide, formaldehyde, toluene, and xylene.

Final Thoughts
If you want to add more fantastic decoration to your home or enjoy the natural beauty that pothos plants bring, then learning how to make a DIY Pothos moss pole is a skill to add to your repertoire. We suggest you take the necessary time to figure out how to prepare it instead of rushing it. If you do it with care once, the skill is effortless to master. Thus, you can fill your entire home with trailing and climbing plants and reap their benefits. Pothos plants also occur in several varieties, and all of them have flexible stems. Thus, learning this method can help you easily house all the distinct types of pothos plants.